When dealing with software that you run in Kubernetes, it is a common requirement to have your applications running on certain types of underlying infrastructure (virtual machines). Perhaps your software has a high memory requirement, or maybe needs GPU optimization. At any rate, you might find yourself saying “I need these pods to be running on this type of virtual machine”.
With Azure Kubernetes Service (AKS) this is possible through the use of node pools. Node pools are the compute representation of the underlying agent nodes for a Kubernetes cluster.
What is a node pool?
A node pool is a collection of VMs (usually backed by a Virtual Machine Scale Set (VMSS)) that can participate in a Kubernetes cluster.
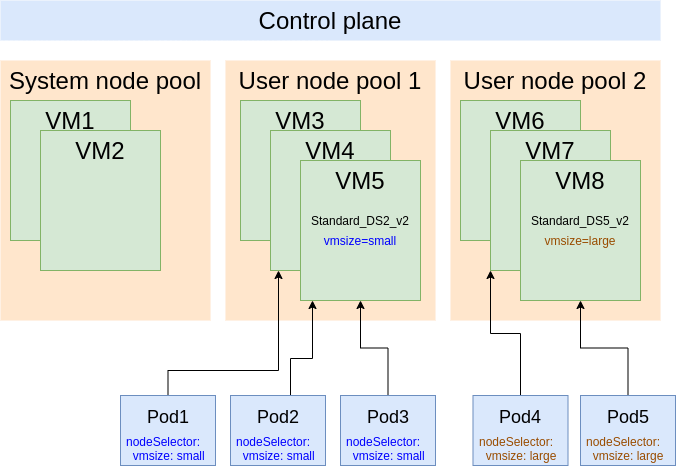
In the above diagram you can see that we have three node pools. The first is the system node pool, which contains the system-related pods (e.g. kube-system). This system node pool is created by default when you create your AKS cluster. It will run the system pods, but also run the user pods if it is the only node pool in the cluster. It is the only “required” node pool.
You may want to add compute and have different options for your agent nodes, so you can create additional user node pools. All VMs in the same node pool share the same configuration (VM size, labels, disk size, etc.).
If you have some software that should be running on a specific type of compute, you can create a node pool to host that software. We’ll see how to do that and how to wire it all up.
Create the AKS cluster with user node pools
To create the AKS cluster, we’ll start out with the origin (only the single node pool):
1
2
3
4
5
6
7
$ az group create \
    --location eastus \
    --name rg
$ az aks create \
    --resource-group rg \
    --name aks \
    --node-count 2
After this cluster is created, we can see that we have our two agent nodes (system) ready:
1
2
3
4
$ kubectl get nodes
NAME                                STATUS   ROLES   AGE   VERSION
aks-nodepool1-36584864-vmss000000   Ready    agent   69s   v1.17.13
aks-nodepool1-36584864-vmss000001   Ready    agent   73s   v1.17.13
A helpful way to see the node pool breakdown is to run az aks nodepool list:
1
2
3
4
$ az aks nodepool list --resource-group rg --cluster-name aks -o table
Name       OsType    VmSize           Count    MaxPods    ProvisioningState    Mode
---------  --------  ---------------  -------  ---------  -------------------  ------
nodepool1  Linux     Standard_DS2_v2  2        110        Succeeded            System
This shows that we only have our single system node pool with two VMs in it.
If we wanted to create two additional node pools, one that has VMs that are smaller and one with VMs that are larger, we can do the following:
1
2
3
4
5
6
7
8
9
10
11
12
13
14
15
$ az aks nodepool add \
    --resource-group rg \
    --cluster-name aks \
    --name nodepool2 \
    --node-count 3 \
    --node-vm-size Standard_DS2_v2 \
    --labels "vmsize=small"

$ az aks nodepool add \
    --resource-group rg \
    --cluster-name aks \
    --name nodepool3 \
    --node-count 3 \
    --node-vm-size Standard_DS5_v2 \
    --labels "vmsize=large"
The important thing to note here is the --labels parameter, which will put a label on each of these nodes in the node pool. It is through this label that we’ll be able to specify which nodes our pods should land on.
Now we can see that we have these additional agent nodes:
1
2
3
4
5
6
7
8
9
10
$ kubectl get nodes --label-columns vmsize
NAME                                STATUS   ROLES   AGE     VERSION    VMSIZE
aks-nodepool1-36584864-vmss000000   Ready    agent   7m5s    v1.17.13
aks-nodepool1-36584864-vmss000001   Ready    agent   7m9s    v1.17.13
aks-nodepool2-36584864-vmss000000   Ready    agent   3m13s   v1.17.13   small
aks-nodepool2-36584864-vmss000001   Ready    agent   3m9s    v1.17.13   small
aks-nodepool2-36584864-vmss000002   Ready    agent   3m18s   v1.17.13   small
aks-nodepool3-36584864-vmss000000   Ready    agent   2m48s   v1.17.13   large
aks-nodepool3-36584864-vmss000001   Ready    agent   2m35s   v1.17.13   large
aks-nodepool3-36584864-vmss000002   Ready    agent   2m48s   v1.17.13   large
And the additional node pools:
1
2
3
4
5
6
$ az aks nodepool list --resource-group rg --cluster-name aks -o table
Name       OsType    VmSize           Count    MaxPods    ProvisioningState    Mode
---------  --------  ---------------  -------  ---------  -------------------  ------
nodepool1  Linux     Standard_DS2_v2  2        110        Succeeded            System
nodepool2  Linux     Standard_DS2_v2  3        110        Succeeded            User
nodepool3  Linux     Standard_DS5_v2  3        110        Succeeded            User
Create pods on specific node pools
When we created our node pools, we had the option to specify --labels. This translates to node labels which can be used in the PodSpec. If we were creating a deployment that should have pods scheduled only on large VMs, it could look like this:
1
2
3
4
5
6
7
8
9
10
11
12
13
14
15
16
17
18
19
20
21
kind: Deployment
apiVersion: apps/v1
metadata:
  name: test-app1
spec:
  replicas: 16
  selector:
    matchLabels:
      app: app1
  template:
    metadata:
      labels:
        app: app1
    spec:
      containers:
        - name: app1
          image: debian:latest
          command: ["/bin/bash"]
          args: ["-c", "while true; do echo hello world; sleep 10; done"]
      nodeSelector:
        vmsize: large
As you can see, we set our nodeSelector to match the label selector of the node pool, vmsize=large.
And now with these pods running, we can validate which nodes they are running on:
1
2
3
4
5
6
7
8
9
10
11
12
13
14
15
16
17
18
$ kubectl get pods -o wide
NAME                         READY   STATUS    RESTARTS   AGE   IP           NODE                                NOMINATED NODE   READINESS GATES
test-app1-555d8bc87b-2gj9j   1/1     Running   0          23s   10.244.5.3   aks-nodepool3-36584864-vmss000000   <none>           <none>
test-app1-555d8bc87b-46p4m   1/1     Running   0          23s   10.244.7.4   aks-nodepool3-36584864-vmss000001   <none>           <none>
test-app1-555d8bc87b-6hvzw   1/1     Running   0          23s   10.244.7.3   aks-nodepool3-36584864-vmss000001   <none>           <none>
test-app1-555d8bc87b-6vj9b   1/1     Running   0          23s   10.244.6.5   aks-nodepool3-36584864-vmss000002   <none>           <none>
test-app1-555d8bc87b-9zkpt   1/1     Running   0          23s   10.244.5.2   aks-nodepool3-36584864-vmss000000   <none>           <none>
test-app1-555d8bc87b-b6bqm   1/1     Running   0          23s   10.244.5.6   aks-nodepool3-36584864-vmss000000   <none>           <none>
test-app1-555d8bc87b-grv77   1/1     Running   0          23s   10.244.7.2   aks-nodepool3-36584864-vmss000001   <none>           <none>
test-app1-555d8bc87b-hgjwz   1/1     Running   0          23s   10.244.6.6   aks-nodepool3-36584864-vmss000002   <none>           <none>
test-app1-555d8bc87b-m27cp   1/1     Running   0          23s   10.244.7.5   aks-nodepool3-36584864-vmss000001   <none>           <none>
test-app1-555d8bc87b-m4bck   1/1     Running   0          23s   10.244.6.2   aks-nodepool3-36584864-vmss000002   <none>           <none>
test-app1-555d8bc87b-msztk   1/1     Running   0          23s   10.244.5.5   aks-nodepool3-36584864-vmss000000   <none>           <none>
test-app1-555d8bc87b-mvz9k   1/1     Running   0          23s   10.244.5.4   aks-nodepool3-36584864-vmss000000   <none>           <none>
test-app1-555d8bc87b-mwm5v   1/1     Running   0          23s   10.244.6.3   aks-nodepool3-36584864-vmss000002   <none>           <none>
test-app1-555d8bc87b-q9p7b   1/1     Running   0          23s   10.244.6.4   aks-nodepool3-36584864-vmss000002   <none>           <none>
test-app1-555d8bc87b-wsbjk   1/1     Running   0          23s   10.244.6.7   aks-nodepool3-36584864-vmss000002   <none>           <none>
test-app1-555d8bc87b-xtdnr   1/1     Running   0          23s   10.244.7.6   aks-nodepool3-36584864-vmss000001   <none>           <none>
The NODE column shows that, as expected, these pods are running only on nodes in nodepool3, which matches the Standard_DS5_v2 VMs.
Summary
By designing your node pools to fit your software requirements, with AKS you can easily and effectively target certain types of VMs for your workloads to run on. This gives you the control you need to successfully deliver your software on your Kubernetes cluster!