Authentication is a difficult problem, and even in a cloud-first/cloud-native world it is still a tough problem to solve.
A feature in Azure that makes this much easier to approach is Managed Service Identities (MSI). This allows Azure resources to automatically have an identity that can be used to authenticate against resources secured with Azure Active Directory (databases, storage, etc.).
Instead of passing around usernames and passwords or having to worry about baking private keys in images, MSIs give us a very simple out-of-the-box experience that is secure and requires a lot less development effort.
Traditionally MSIs have been largely implemented directly from Virtual Machines (IaaS). In the Kubernetes world, we have an extra layer on top of VMs. But the usage of MSIs is still possible through the aad-pod-identity project. For more information on exactly how it works under the covers, see the source repo for documentation.
Below I will be showing you how you can authenticate an application running in a Kubernetes cluster to Azure resources through MSIs without having to pass around any secret data. For this, I will be connecting a sample application running in Azure Kubernetes Service (AKS) to an Azure SQL database. All of the source code for this sample/demo can be found in my GitHub repo.
Create the AKS cluster and the database
Let’s setup the Azure resources that we need for this sample.
First, the Kubernetes test cluster:
1
2
3
4
5
6
7
8
9
$ az group create \
    -n resource_group -l eastus
$ az aks create \
    -n k8scluster \
    -g resource_group \
    --node-count 1
$ az aks get-credentials \
    -g resource_group \
    -n k8scluster
Then create an Azure SQL server and database:
1
2
3
4
5
6
7
8
9
$ az sql server create \
    -g resource_group \
    -n sql_server_name \
    --admin-user admin_user \
    --admin-password '<password>'
$ az sql db create \
    -n testdb \
    --server sql_server_name \
    -g resource_group
I’m going to add a test table in the new database and seed some sample data:
1
2
3
4
5
6
7
8
9
10
11
CREATE TABLE messagelist
(
    id INT IDENTITY(1, 1),
    message_text NVARCHAR(128)
);

INSERT INTO messagelist
VALUES ('my message');

INSERT INTO messagelist
VALUES ('new message');
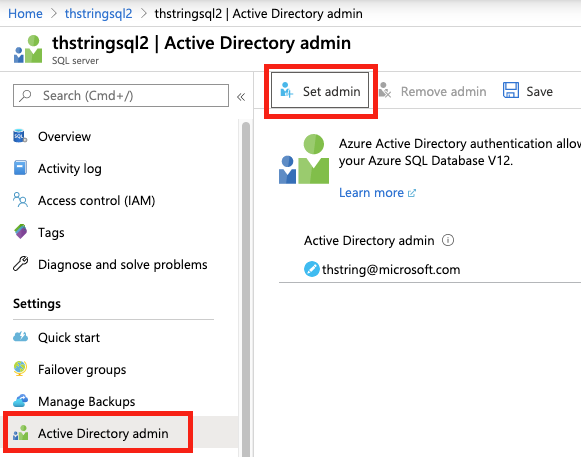
One final step for the database server is that you have to set an Azure Active Directory admin. This is needed to be able to add users in the database from Azure AD as a provider.
Install aad-pod-identity
1
$ kubectl apply -f https://raw.githubusercontent.com/Azure/aad-pod-identity/master/deploy/infra/deployment-rbac.yaml
For more information on this project, see the aad-pod-identity GitHub repo.
Create the Azure Identity and database user
Now we have to create the Identity in Azure Active Directory that we want our pods (and the applications living in our pods) to use:
1
2
3
4
5
6
$ az identity create \
    -n k8scluster -o json \
    -g $(az aks show \
        -n k8scluster \
        -g resource_group \
        --query "nodeResourceGroup" -o tsv)
Note: You’ll need the output of the identity creation to be used below!
Above you’ll notice that we want to create the Identity in the same resource group as the AKS cluster’s node resource group (not the resource group that has the AKS resource itself). This will simplify the setup, which would require permission settings if the identity was created away from the node resource group.
Now on the database, we have to create a new user that is pulled from Azure AD (this is done in Azure SQL database by specifying FROM EXTERNAL PROVIDER):
1
2
CREATE USER [k8scluster] FROM EXTERNAL PROVIDER;
EXEC sp_addrolemember 'db_owner', 'k8scluster';
Note: I’m adding the new user to the db_owner role but this is only for testing and demo purposes. In a non-dev environment you should be giving your database principals only the permissions they need to complete their tasks.
Tell the Kubernetes cluster what Identity to use
Now that we’ve created the Identity in Azure AD, and we’ve linked this up to the database it’s time to wire this all together in the Kubernetes cluster. We do this by creating the following resources in our Kubernetes cluster:
AzureIdentity
This resource type was created when we installed the aad-pod-identity project, and this is the resource representation of the Identity itself. This is what tells Kubernetes which Azure Identity to use.
1
2
3
4
5
6
7
8
apiVersion: "aadpodidentity.k8s.io/v1"
kind: AzureIdentity
metadata:
  name: sqlaad1
spec:
  type: 0
  ResourceID: <id_from_identity>
  ClientID: <client_id_from_identity>
id_from_identity and client_id_from_identity can be found from the output of az identity create above.
AzureIdentityBinding
Now that we have the identity resource (AzureIdentity), we need to create a binding. This binding will effectively say “for all pods tagged with this label, use this identity”. It could look like this:
1
2
3
4
5
6
7
apiVersion: "aadpodidentity.k8s.io/v1"
kind: AzureIdentityBinding
metadata:
  name: sqlaadbinding1
spec:
  AzureIdentity: sqlaad1
  Selector: sqlaad
In this example, we’re saying that for any pod that matches our selector of “sqlaad”, use the Identity specified. We have to add this selector as a label in our pods that we want this Identity applied to (see below).
Specifying the Identity on a pod
Now that we have all of the components, it’s time to create our application pod. But now we want to specify that our pod should use our new Identity. This can be done by specifying the selector for the aadpodidbinding label. Our pod would look similar to this:
1
2
3
4
5
6
7
8
9
10
11
12
13
14
15
16
apiVersion: v1
kind: Pod
metadata:
  name: aadtest1
  labels:
    aadpodidbinding: sqlaad
spec:
  containers:
    - name: aadtest1
      image: <image_id>
      imagePullPolicy: Always
      env:
        - name: SERVER_NAME
          value: myserver.database.windows.net
        - name: DATABASE_NAME
          value: testdb
Summary
With these steps above we now have secure and easy auth from an application running in Kubernetes to a database being hosted in Azure. All through the use of Managed Service Identities. For complete code of this sample/demo, please refer to my GitHub repo.